 Save
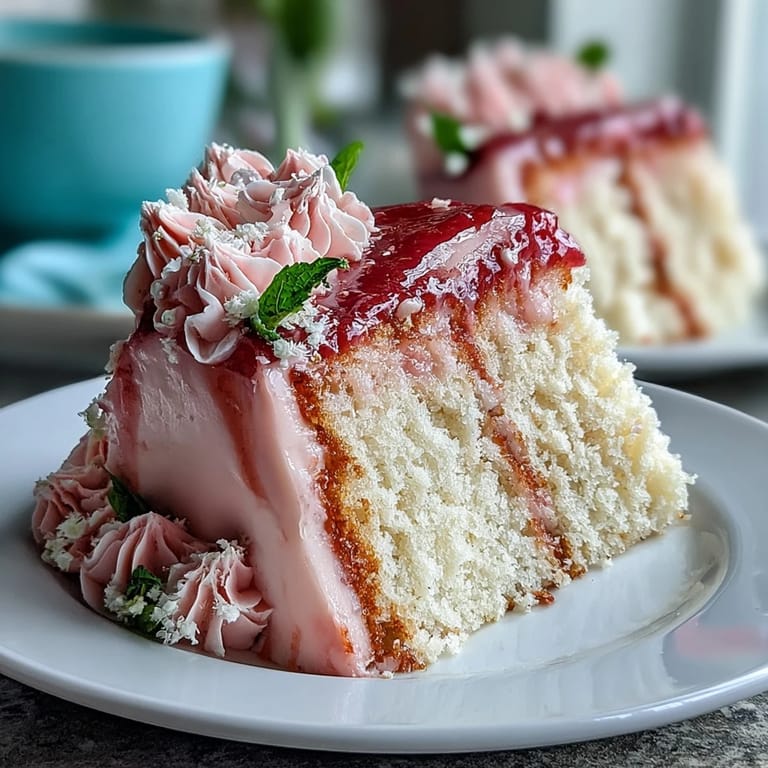
Save My sister called me three weeks before Mother's Day in a panic—she'd volunteered to bring dessert to our family brunch and suddenly realized she'd promised something spectacular. I found myself at her kitchen table at midnight, sketching out a cake design on the back of an envelope, thinking about how our mom always wore soft pink and kept fresh flowers on the windowsill. That's when this cake was born, not from a cookbook but from the need to create something that felt as elegant and nurturing as she does. The ombre effect seemed impossible at first, but it turned out to be forgiving and stunning.
What I didn't expect was watching my mom's face when she saw it on the table that Sunday morning—not just the cake, but all of us gathered around it, knowing someone had put real thought into the colors and flowers. She actually teared up before cutting into it, which felt like the entire point. That's when I realized this recipe isn't really about technique or presentation, though those matter. It's about showing up for someone with something you made yourself.
Ingredients
- All-purpose flour (2 ½ cups): This is your cake's foundation—make sure it's fresh and sifted to avoid dense layers that won't rise properly.
- Baking powder (2 ½ tsp): Don't skip the sifting with flour; lumps create uneven rising and tunnel-like holes in your crumb.
- Unsalted butter (1 cup for sponge, 1 ½ cups for frosting): Room temperature is non-negotiable here—cold butter won't cream properly and you'll end up with a grainy cake instead of tender crumb.
- Granulated sugar (2 cups): This sweetens and aerates; the creaming process with butter is where your cake gets its light texture, so don't rush those 3-4 minutes.
- Eggs (4 large, room temperature): Temperature matters because cold eggs won't incorporate smoothly into the batter, risking a curdled mixture that bakes up dense.
- Pure vanilla extract (1 tbsp for cake, 2 tsp for frosting): Vanilla bridges all the flavors together—use real extract, not imitation, and you'll taste the difference immediately.
- Whole milk (1 cup, room temperature): The alternating method with flour keeps your batter from separating; cold milk can cause the butter and eggs to break.
- Powdered sugar (5 cups, sifted): Sifting removes clumps that would leave gritty spots in your frosting and make spreading uneven.
- Gel food coloring (pink): Gel won't thin your buttercream like liquid coloring does, and you'll need less of it to get those gorgeous ombre shades.
- Edible flowers (violets, pansies, or rose petals): Add these just before serving so they stay fresh and don't wilt into the buttercream; non-edible toppers are fine for decoration but remember to remove them.
Tired of Takeout? 🥡
Get 10 meals you can make faster than delivery arrives. Seriously.
One email. No spam. Unsubscribe anytime.
Instructions
- Prepare your workspace:
- Preheat the oven to 350°F (175°C) and grease three 8-inch round pans with a light hand—you want coverage without excess butter pooling. Line the bottoms with parchment paper so your cakes release cleanly and don't stick at all.
- Combine dry ingredients:
- In a medium bowl, whisk together the flour, baking powder, and salt until they're evenly distributed and any lumps are broken up. This step prevents pockets of dry flour in your finished cake.
- Cream the butter and sugar:
- Using an electric mixer on medium-high speed, beat the room-temperature butter and sugar together for 3-4 minutes until the mixture is pale, fluffy, and noticeably lighter in color. This is where the magic happens—you're building air into the batter that will give you that tender crumb.
- Incorporate eggs and vanilla:
- Add eggs one at a time, beating well after each addition so each egg fully incorporates before you add the next. After all eggs are in, add the vanilla extract and mix until it disappears into the batter.
- Alternate flour and milk:
- Add the flour mixture in three additions, alternating with the milk and beginning and ending with flour—this keeps the batter emulsified and prevents it from breaking. Mix on low speed just until the ingredients are combined; overmixing develops gluten and toughens your cake.
- Fill and bake:
- Divide the batter evenly among the three pans (a scale helps here if you have one) and smooth the tops. Bake for 25-30 minutes until a toothpick inserted into the center comes out clean or with just a few moist crumbs.
- Cool properly:
- Let the cakes cool in their pans for 10 minutes—this gives them just enough time to set without sticking—then turn them out onto wire racks to cool completely. Don't rush this step; warm cakes will crack when you frost them.
- Beat the buttercream base:
- In a clean bowl, beat the room-temperature butter on high speed for 2-3 minutes until it's creamy and pale. Gradually add the sifted powdered sugar on low speed, then add vanilla and milk, and finally beat on high for 3 minutes until the texture is fluffy and light.
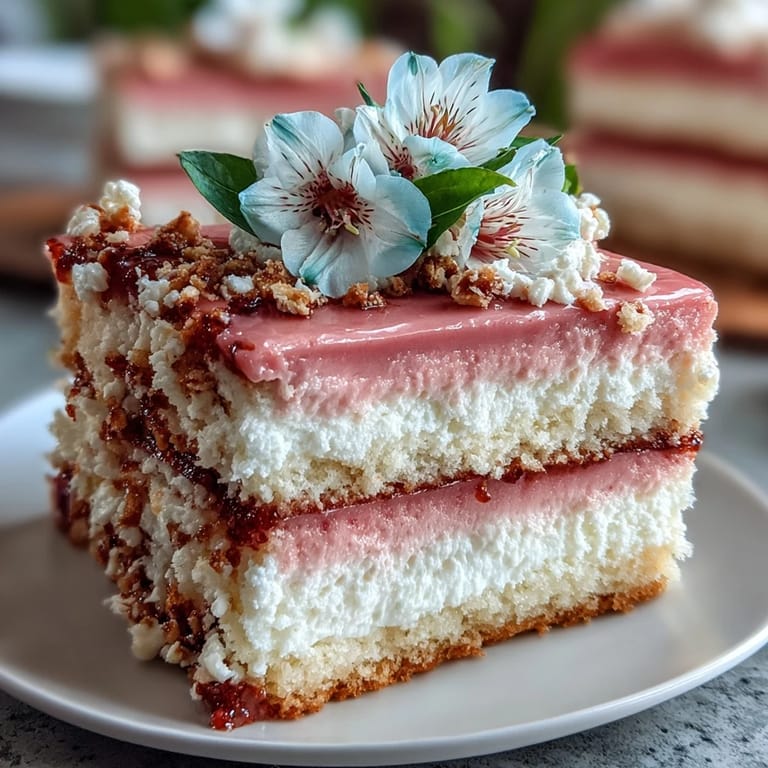
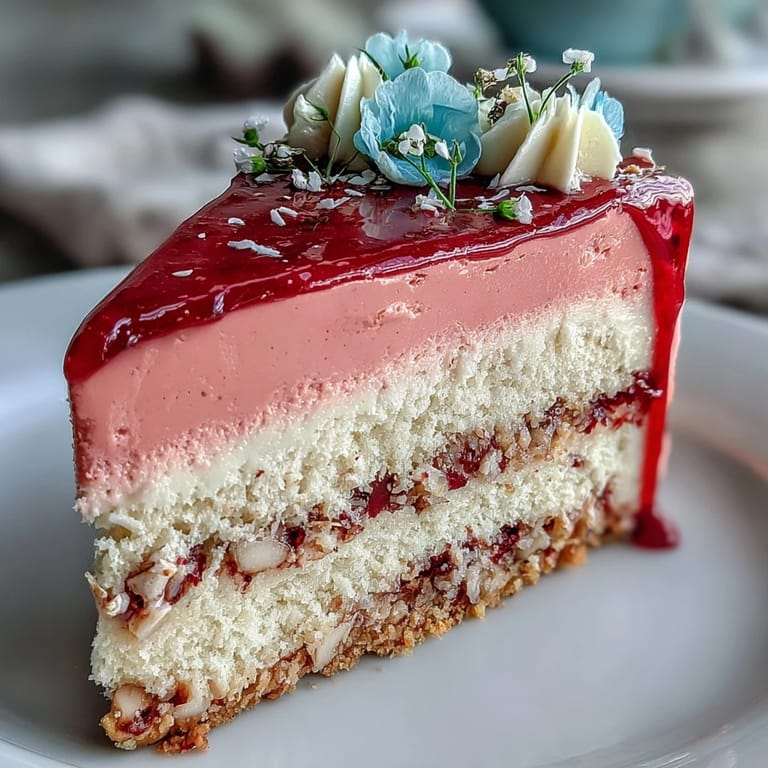
- Create the ombre effect:
- Divide the buttercream into four bowls: leave one white and add increasing amounts of pink gel coloring to the other three to create light, medium, and dark shades. The beauty is in the gradation, so take a moment to compare your colors side by side.
- Layer and frost:
- Place the first cake layer on your serving plate, spread the darkest pink buttercream on top, add the second layer with medium pink, then the final layer with light pink on top. Use the remaining white buttercream to cover the sides, creating a contrast that makes the ombre effect pop.
- Smooth and blend:
- Use an offset spatula to smooth the frosting, and if you want that blended ombre effect to travel up the sides, use a bench scraper to gently feather the colors together. This step takes patience but creates that showstopping gradient everyone will notice.
- Add flowers and chill:
- Arrange your edible flowers on top and around the cake just before serving for maximum freshness. Chill the finished cake for at least 30 minutes—this firms up the buttercream and makes slicing cleaner.
 Save
Save My sister sent me a photo of the leftovers the next day with a note: 'Mom kept a slice in the fridge and showed it to everyone who stopped by.' Sometimes the best recipes aren't the most complicated ones—they're the ones that give you permission to pour a little love into something visible.
Why This Cake Works for Special Occasions
There's something about the process of creating four different shades of buttercream that makes you slow down and think about aesthetics in a way regular baking doesn't demand. Each time you add a drop more coloring, you're making a choice about how the final cake will look. This intentionality is what transforms a regular vanilla layer cake into something that feels celebratory—it's not harder technically, but it looks like you cared enough to be deliberate about every detail. And honestly, that's what your mom (or whoever you're celebrating) will remember.
Timing and Preparation Strategy
I've learned that baking this cake on the actual day you're serving it creates unnecessary stress, especially when you're trying to keep the kitchen calm before a gathering. A much smarter approach is to bake your layers the day before, store them in an airtight container at room temperature, and do all your frosting and decorating in the morning light when you can see colors clearly and won't be rushed. If you want to get even further ahead, you can make the buttercream 2-3 days in advance and keep it in the fridge—just bring it to room temperature and re-whip it for 2 minutes before using. This strategy means you're actually enjoying the process instead of panicking about timing.
Small Details That Make the Difference
The difference between a good cake and a show-stopping one often comes down to finishing touches that take almost no extra time. Simple syrup brushed on the cooled cake layers adds subtle moisture and flavor without being obvious, and it means your cake stays tender even a day later. The edible flowers should go on literally just before serving so they look dewy and fresh rather than wilted into the frosting. And if you're worried about the ombre effect looking messy, remember that imperfect blending often looks more elegant than a perfectly straight gradient—it reads as intentional and artistic rather than robotic.
- Brush each cooled cake layer lightly with simple syrup (equal parts sugar and water, cooled) for extra moisture and subtle sweetness.
- Keep your offset spatula dipped in warm water and wipe it clean between strokes for the smoothest, most polished frosting finish.
- Add edible flowers within 30 minutes of serving so they stay crisp and beautiful rather than absorbing moisture from the buttercream.
 Save
Save Make this cake, and you're not just baking—you're creating a moment worth remembering. That's the whole point.
Recipe FAQs
- → How do you achieve the pink ombre effect in the buttercream?
Divide the buttercream into four portions, leaving one white. Add pink food coloring gradually to the other three portions to create light to dark shades, then layer them on the cake from darkest to lightest.
- → Can I prepare the vanilla sponge in advance?
Yes, the vanilla sponge layers can be baked a day ahead, wrapped tightly, and stored at room temperature or refrigerated before assembling and frosting.
- → What types of flowers are suitable for decorating this cake?
Use edible flowers like violets, pansies, or rose petals to ensure safety and add a natural, fragrant touch to the decoration.
- → What is the best way to ensure a smooth buttercream finish?
Beat buttercream thoroughly until creamy and use an offset spatula to spread layers evenly. For a polished look, chill the cake between layers and use a bench scraper to blend the ombre effect on the sides.
- → How can I make the cake layers more moist?
Brush each cooled cake layer with simple syrup before frosting to add extra moisture and enhance flavor.