 Save
Save Last summer, I was packing for a hiking trip and realized I'd forgotten to grab snacks. My kitchen felt chaotic—half-empty containers of oats, a jar of peanut butter, and dried cranberries scattered across the counter. In a moment of improvisation, I mixed everything together with honey and pressed it into a pan. Twenty minutes later, I had these chewy, satisfying bars that became the highlight of the trail. Now I make them constantly, not just for adventures, but for those mornings when I need something real before everything else starts.
I brought a batch to a work picnic once, and someone asked if I'd bought them from a bakery. That moment—watching people enjoy something I'd made without any fuss or complexity—reminded me that the best recipes are the ones that feel effortless to make but taste like you've spent the afternoon in the kitchen.
Ingredients
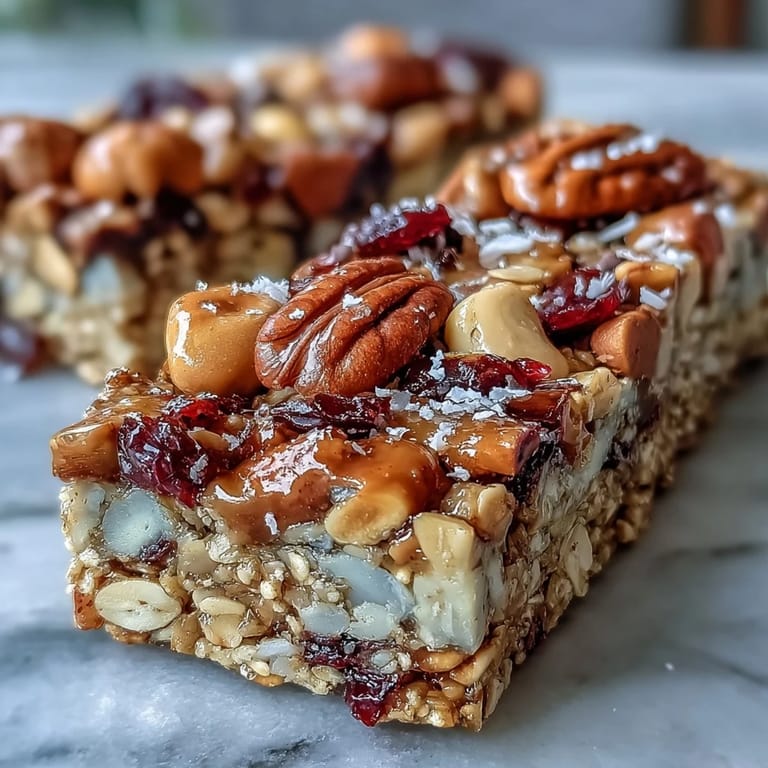
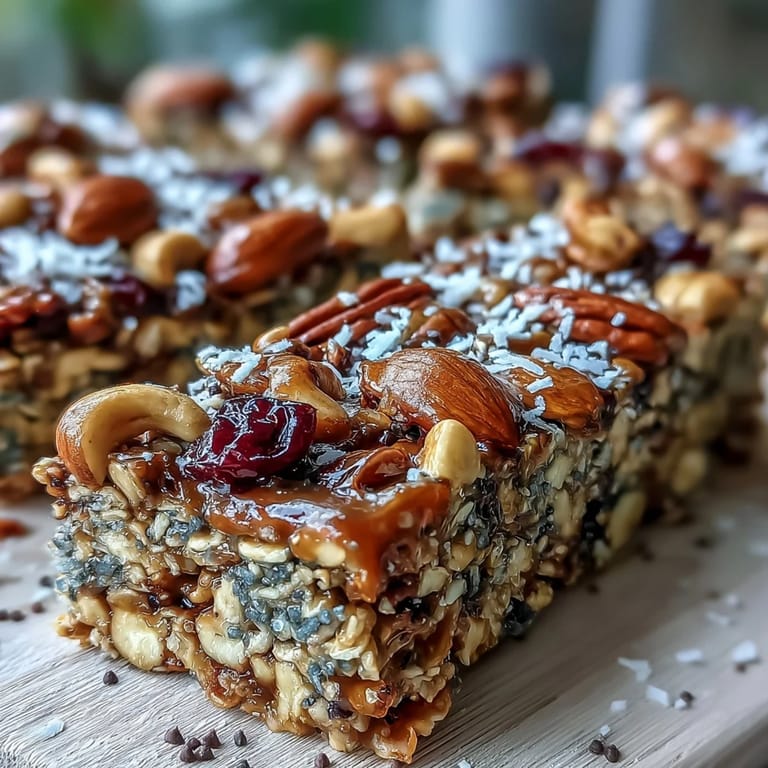
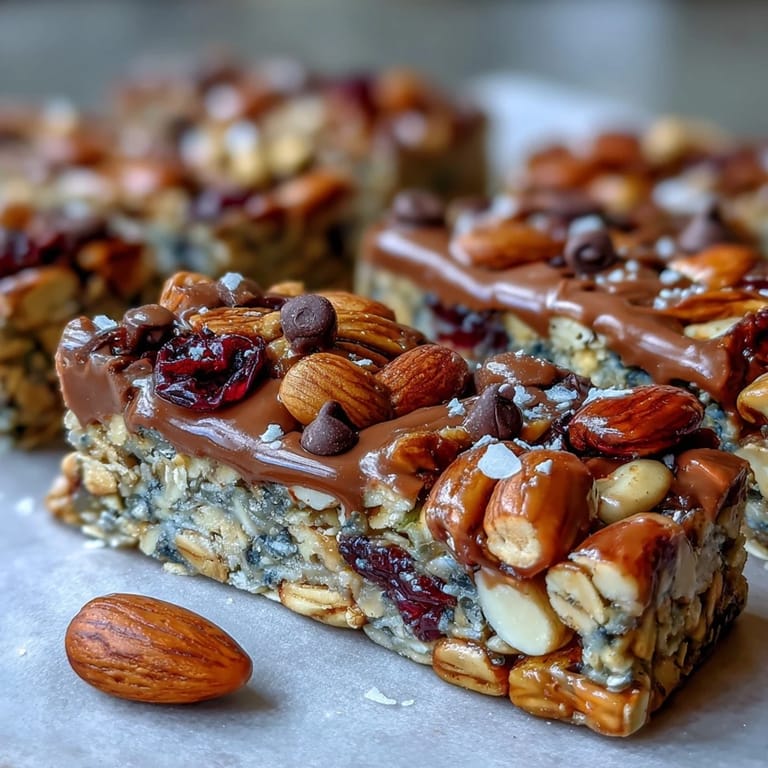
- Old-fashioned rolled oats (2 cups): These are the backbone, holding everything together while staying chewy and substantial—don't grab the instant packets, they'll make everything mushy.
- Crisp rice cereal (1 cup): This adds lightness and keeps the bars from becoming a dense brick, plus it gives you that satisfying crunch.
- Mixed nuts (1/2 cup, chopped): Use whatever you have on hand—almonds, walnuts, pecans all work beautifully and keep the texture interesting.
- Dried fruit (1/2 cup): Cranberries bring tartness, raisins add sweetness, apricots give you chewiness—mix whatever feels right to you.
- Unsweetened coconut (1/4 cup, optional): If you use it, toast it lightly first in a dry pan for deeper flavor that lingers on your tongue.
- Salt (1/4 teaspoon): Just a pinch to wake up all the other flavors and prevent everything from tasting flat.
- Honey or maple syrup (1/2 cup): This is your glue—use what you prefer, though maple gives a earthier finish.
- Peanut or almond butter (1/3 cup): Creamy works better here than chunky since you need everything to bind smoothly.
- Vanilla extract (1 teaspoon): A small splash that rounds out the whole mixture with warmth.
- Mini chocolate chips (1/4 cup, optional): Add these after the mixture cools slightly so they don't disappear into the heat.
- Chia or flaxseeds (1 tablespoon, optional): A nice boost if you want extra nutrition without anyone really noticing.
Tired of Takeout? 🥡
Get 10 meals you can make faster than delivery arrives. Seriously.
One email. No spam. Unsubscribe anytime.
Instructions
- Prepare your pan:
- Line an 8-inch square pan with parchment paper, letting the edges hang over the sides so you can lift the whole thing out later without wrestling with a spatula. This small step saves you from having crumbled bar frustration.
- Combine the dry team:
- Toss together the oats, rice cereal, nuts, dried fruit, coconut if you're using it, and salt in a large bowl, making sure everything's distributed evenly. This takes about a minute and sets you up for success.
- Melt the binder:
- In a small saucepan over low heat, stir the honey and peanut butter together until they're completely smooth and warm, roughly 2 to 3 minutes. You'll smell it before it's ready—that toasty, nutty aroma is your signal to stop before anything burns.
- Marry the mixtures:
- Remove the pan from heat, stir in the vanilla, then pour this warm mixture over your dry ingredients and mix everything together until every piece of oat and fruit is coated. Take your time here—rushing leads to dry pockets.
- Handle the chocolate carefully:
- If you're adding chocolate chips, let the mixture cool for a couple of minutes first, then fold them in gently so they stay whole instead of melting into oblivion. This is a small moment that makes a real difference.
- Press and set:
- Transfer everything to your prepared pan and press it down firmly with a spatula or the bottom of a measuring cup, creating an even, compact layer. Don't be shy—the more pressure you apply, the better your bars hold together.
- Top it off:
- If you'd like, sprinkle extra chocolate chips or nuts on top and press them in gently so they stick. This is purely for looks and joy.
- Chill and be patient:
- Refrigerate for at least an hour until everything is completely set and firm enough to cut cleanly. This is not a step to rush—bars cut too early will crumble.
- Cut and store:
- Lift the bars from the pan using your parchment overhang, place on a cutting board, and slice into 12 bars using a sharp knife and gentle sawing motions. Keep them in an airtight container in the fridge for up to a week.
 Save
Save There's something quietly satisfying about unwrapping a homemade bar from your desk drawer at 3 PM and realizing you're eating something that's actually good for you. It's a small rebellion against processed snacking, and it tastes like you took care of yourself.
Making Them Your Own
The beauty of these bars is that they're forgiving and flexible. Once you make them once, you'll immediately start seeing your kitchen differently—those leftover pistachios, that opened bag of dried cherries, that unsweetened cocoa powder gathering dust. Everything works here. I've made versions with cardamom and cinnamon during colder months, swapped in sunflower seed butter for nut allergies in friends' kitchens, and even tried mixing in matcha powder once, which was surprisingly good if a bit green and grassy.
Storage and Longevity
These bars live happily in the refrigerator for about a week, staying chewy and intact as long as you keep them in an airtight container. I've found that they actually improve slightly on day two or three once everything's had time to meld together. If you need them to last longer, wrap individual bars tightly and freeze them for up to a month—they thaw in about fifteen minutes on the counter, or you can eat them straight from the freezer if you're feeling adventurous and don't mind the harder chew.
Allergen Friendly Adjustments
If nuts are a concern, sunflower seed butter swaps in perfectly for peanut or almond butter, and you can load up on seeds in place of chopped nuts for that textural satisfaction. For dairy-free, just use dairy-free chocolate chips, which are now everywhere and honestly taste almost identical. Check your oats and rice cereal labels if gluten matters in your kitchen, as some brands cross-contaminate during processing even though the ingredients themselves are fine.
- Always read product labels carefully since allergens hide in unexpected places like vanilla extract and cocoa powder.
- When substituting butter alternatives, stick with creamy versions so your mixture binds properly.
- Double-check that your chocolate chips and any add-ins match your dietary needs before mixing.
 Save
Save Make a double batch on a Sunday afternoon, and you'll have a week of mornings that feel intentional and nourishing. These bars are proof that taking care of yourself doesn't require complicated steps or specialized equipment.
Recipe FAQs
- → Can I substitute peanut butter for other nut butters?
Yes, sunflower seed butter or almond butter can be used for nut-free or different flavor options.
- → How do I store the bars to keep them fresh?
Store the bars in an airtight container in the refrigerator for up to one week to maintain freshness and texture.
- → Can I add spices to enhance flavor?
Absolutely, cinnamon, cardamom, or other spices can be added to the dry ingredients for extra warmth and aroma.
- → Are these bars suitable for vegan diets?
Use maple syrup instead of honey and dairy-free chocolate chips to make these bars vegan-friendly.
- → What tools are needed to prepare these bars?
A large mixing bowl, small saucepan, square baking pan, parchment paper, and spatula are needed for easy preparation.